

How To Use Reaktor 6
How to build your first Reaktor synth
Reaktor is a visual programming surroundings dedicated to creating audio processors, tools and instruments.
Information technology can run standalone or every bit a plugin, with practically no functional differences between the two modes. Many of Native Instruments' synths, effects and sound expansions are built on Reaktor technology, and at that place'south also a costless Reaktor Histrion that allows yous to build virtual modular synths using Reaktor Blocks, and to load synths and effects created by NI and their development partners.
Brush up on your Reaktor nuts before following the steps beneath to build your own very ain synth.
Wrappers
Ensembles are the height level entity in Reaktor. They are the outer wrapper for all of the different modules and connections that comprise an issue or instrument, and an instance of Reaktor can host just one ensemble at a time.
There are a number of other wrapper modules available too, the most of import existence Instruments, Macros and Core Cells.
Instruments are very similar to Ensembles in that they create their ain GUI panel, and define visual settings that touch whatsoever modules they contain (note that the give-and-take "Instrument" is used every bit in "tool" or "device", and doesn't imply Instrument modules are intended only for edifice synths).
Macros are essentially merely a container for other modules, and display any visual elements they incorporate within their parent Instrument or Ensemble'south panel.
Levels
To explain Cadre Cells we demand first to talk virtually Reaktor's 3 editing levels: Blocks, Primary and Core. Blocks are fully self-contained Instruments that arrange to NI'due south Reaktor Blocks standard.
That standard ensures easy inter-compatibility with all other Blocks, and this allows y'all to quickly assemble any combination and point flow that you lot like, much similar working with a hardware modular system.
Reaktor's Principal level contains all of the essential modules and tools you need to create practically whatsoever issue, processor or synth. Some Primary modules perform very bones tasks, such as applying mathematical operations to incoming values; others, such as oscillators, are more circuitous in their makeup and function.
Primary likewise includes a built-in library of pre-defined Macros, most of which include GUI elements and so provide another quick manner to assemble furnishings and synths.
Cadre is where you go downwards to the nitty-gritty of things. Core modules tin can only be created inside of a Cadre Cell and allow a deeper level of control over proceedings, and complex DSP routines to exist created.
After a Cadre Cell has been edited, Reaktor compiles the structure into efficient-to-run auto lawmaking. While Core editing looks similar to Master editing, and Core contains many useful modules and its own library of pre-congenital Macros, it is in fact much more akin to writing plan code due to the concepts information technology uses.
Connections
In order to make Reaktor's modules do annihilation useful they need to be continued together in some way, which is why almost every module has at to the lowest degree one terminal on information technology.
Terminals on the left of a module are inputs, while those on the right of a module are outputs. Connecting the modules is simply a instance of dragging between inputs and outputs to create signal paths.
At the Blocks and Principal levels, connector terminals can operate in one of two modes, audio or event, the latter being conceptually similar to control signals such as MIDI or CV/Gate.
This means the event terminals run at a lower data rate than do audio terminals, and so the two can generally non be interconnected without using a converter module in-between (there are some exceptions to this, but using them can weigh heavily on CPU usage).
The "Edifice In Primary" manual shows how to make a simple synth using the included library of pre-defined Macros. It'due south a big help, merely the library Macros don't show how to structure such modules, nor define panel control elements like knobs. Let'southward build ane using only the more than primitive Principal modules…
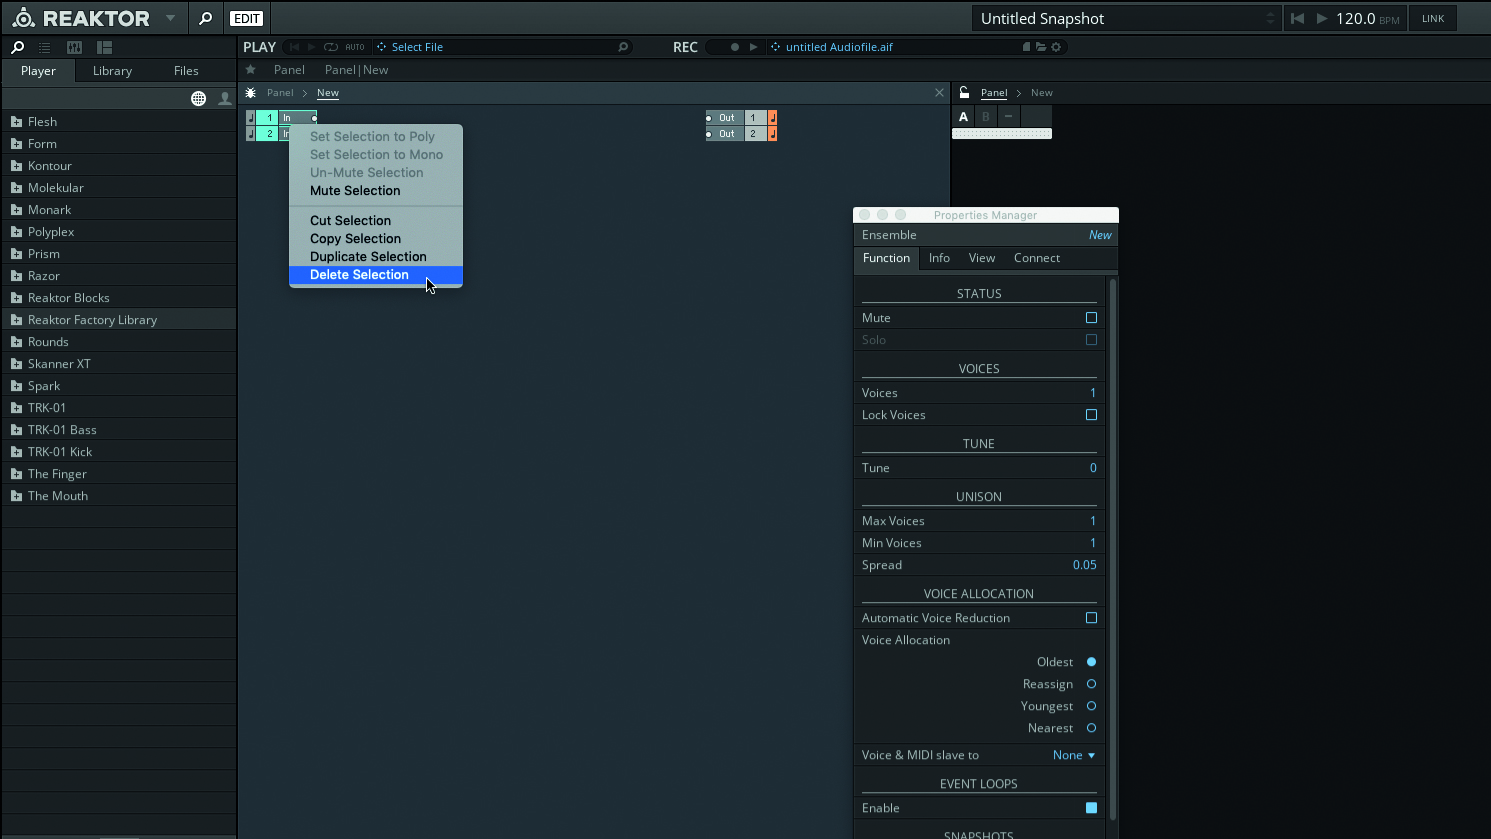
Step one: Fire upwardly Reaktor in standalone mode, create a new Ensemble, and suit the split-screen layout to taste. We don't demand the Ensemble'due south default In Port modules, so delete these. Undocking the Properties Managing director can be useful whilst building in Reaktor, allowing y'all to go on the parameters y'all're working on close to paw – you tin can do this from the program's View menu.
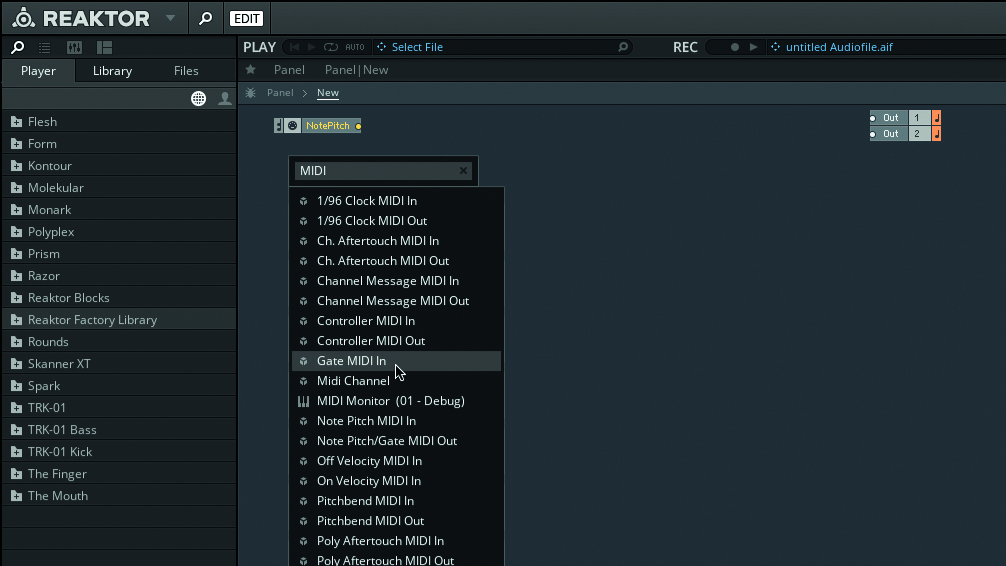
Step two: Click an empty area of the editor and hitting [Enter] or [Return] to open the Searchbox. Type "MIDI" then in the results list locate and click on Note Pitch MIDI In. Repeat to add a Gate MIDI In. Accept a moment to hold the mouse pointer over the new ports and their terminals to read the popup hint text.
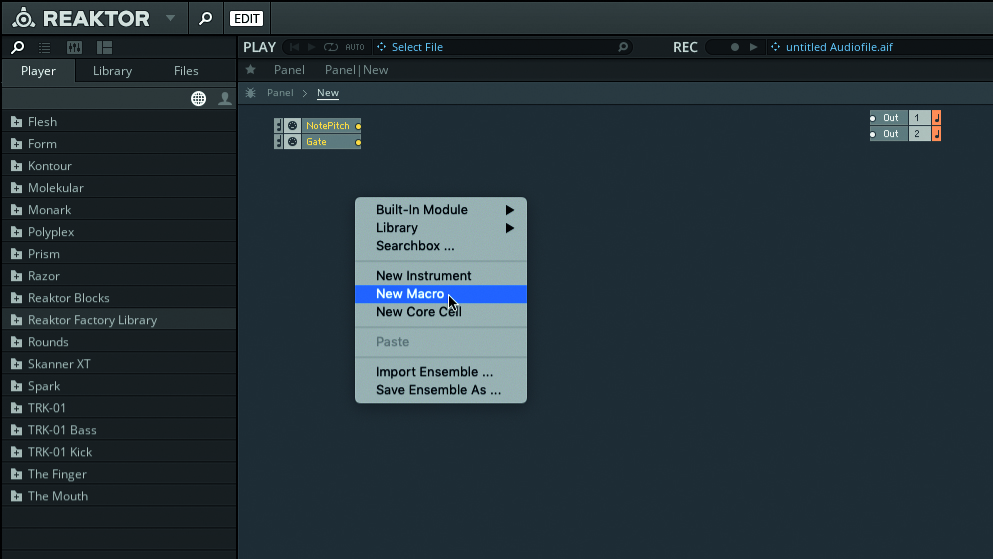
Footstep three: Allow's create a multi-manner oscillator for our synth. Information technology makes sense to pack this into a Macro so that it's cocky-contained. Right-click in the editor and select New Macro from the popup menu. Double click the new Macro'southward proper noun field and alter it to "impleMultiOsc. Double-click the SimpleMultiOsc Macro to view its internal structure, which is empty.
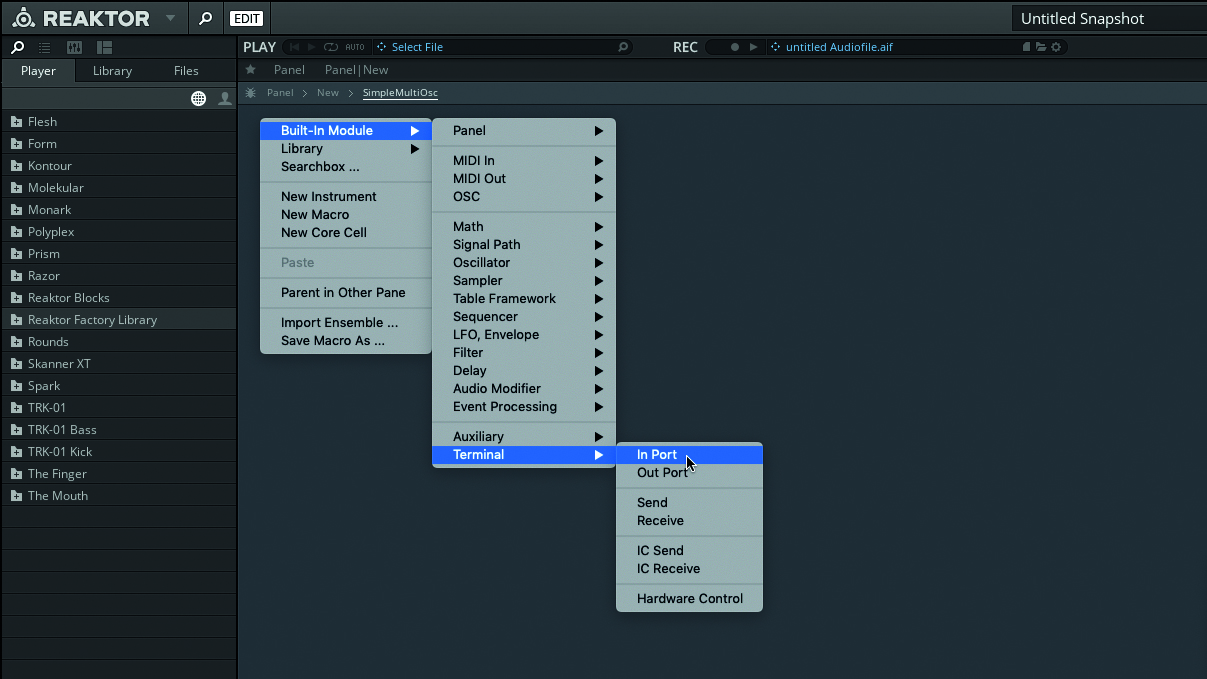
Step 4: Our Macro needs to receive the pitch and gate events from the Ensemble, and so it needs In Port modules. Correct-click and select Built-In Modules > Terminal > In Port, so name the new port as "P" (ie pitch). Repeat this process in order to create an In Port module labelled "A" (ie aamplitude), and a main Out Port for the oscillator's audio.
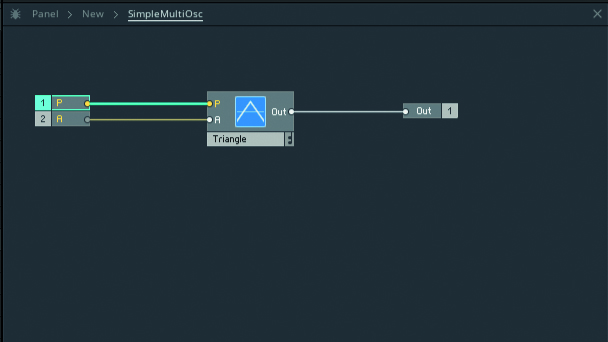
Pace v: Add together a Triangle Oscillator to the construction. Connect your In and Out ports to the matching terminals on the oscillator module. Double-click an empty expanse of the editor to back-out of the Macro and return to the Ensemble, and then connect the Notation Pitch and Gate ports to SimpleMultiOsc's "P" and "A" ports (respectively), and its outputs to the Ensemble's Out Ports.
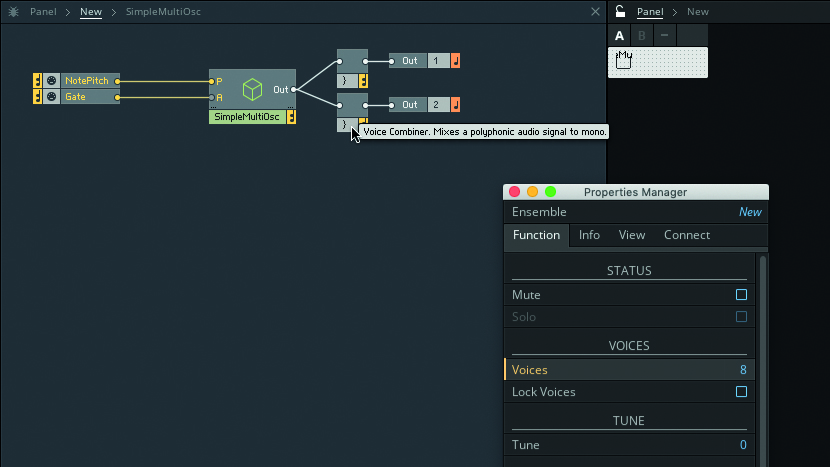
Step vi: Play your oscillator, noticing that information technology'due south monophonic. Click an empty area so that the Ensemble's properties are shown in the Property Managing director, and increment the Voices value to viii. The oscillator is now polyphonic, but the Ensemble's main Out Ports are ever monophonic. Prepare this by inserting a pair of Sound Vocalization Combiners prior to the Out Ports.
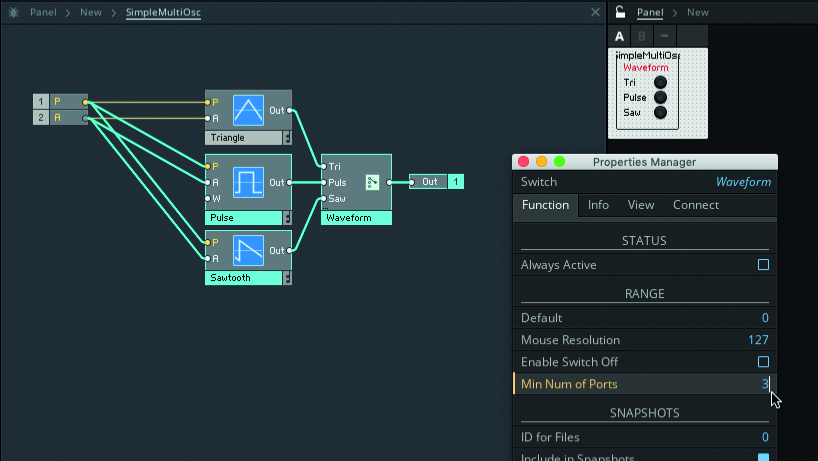
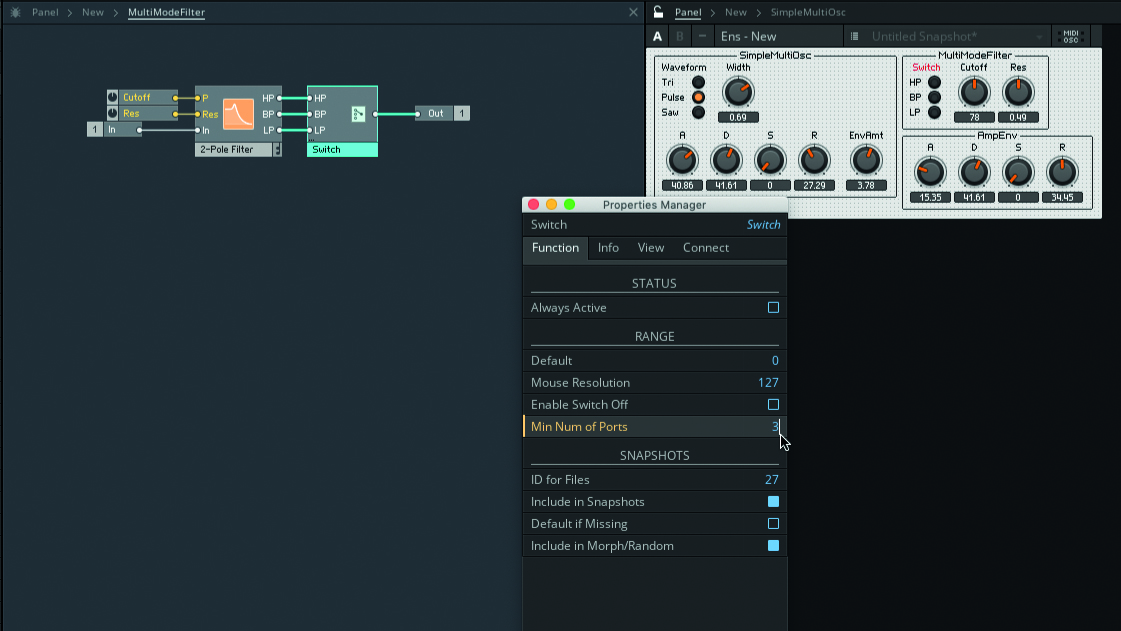
Step 7: Reopen SimpleMultiOsc, create a Pulse and Sawtooth osc, and wire the Macro's In Ports to them. Create a Switch module, name information technology Waveform, and set up its Min Num of Ports to 3. Double-click terminals to rename them Tri, Pulse and Saw. Connect the Osc Outputs to corresponding Switch Inputs. Connect the Switch's Output to the Macro's Out Port.
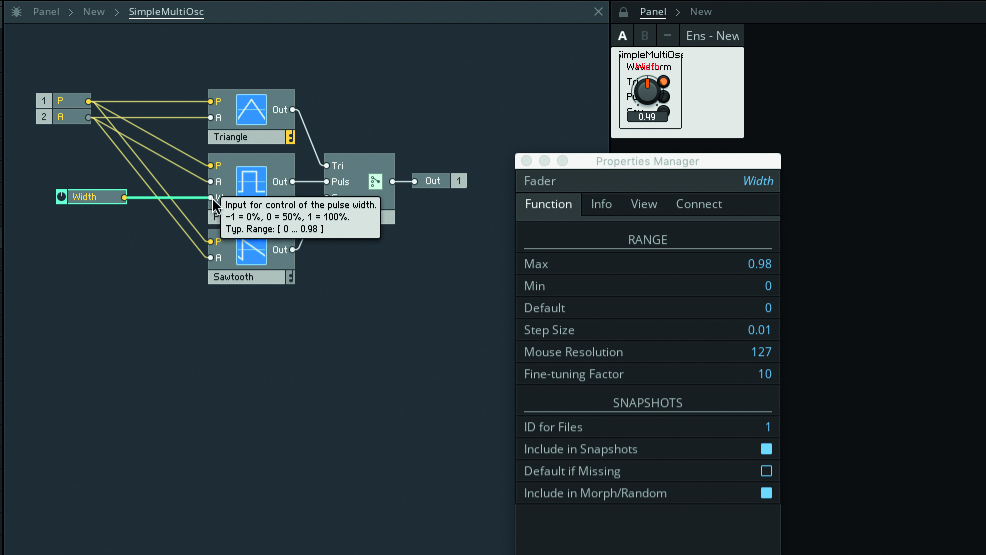
Stride eight: Hold your mouse over the Pulse oscillator's Westward terminal and read the popup hint text, noting the value range information technology suggests. Create a Knob module, name it "Width" and enter the suggested values as the Knob's Max and Min values. Prepare the Knob's Default to 0 and Step Size to 0.01, then connect it to the Pulse oscillator's W concluding.
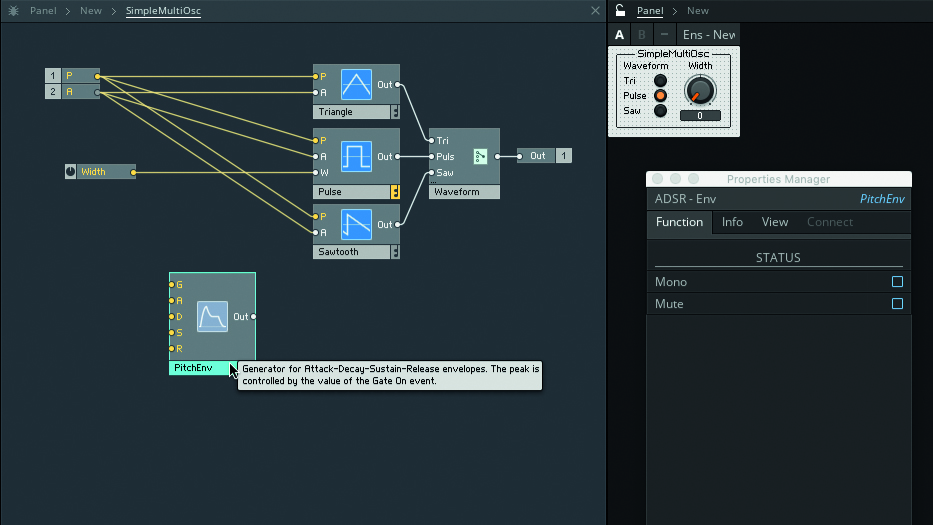
Pace ix: Agree your mouse over the Pulse oscillator's W final and read the popup hint text, noting the value range it suggests. Create a Knob module, name it "Width" and enter the suggested values as the Knob'south Max and Min values. Set the Knob'south Default to 0 and Step Size to 0.01, then connect it to the Pulse oscillator'due south Westward final.
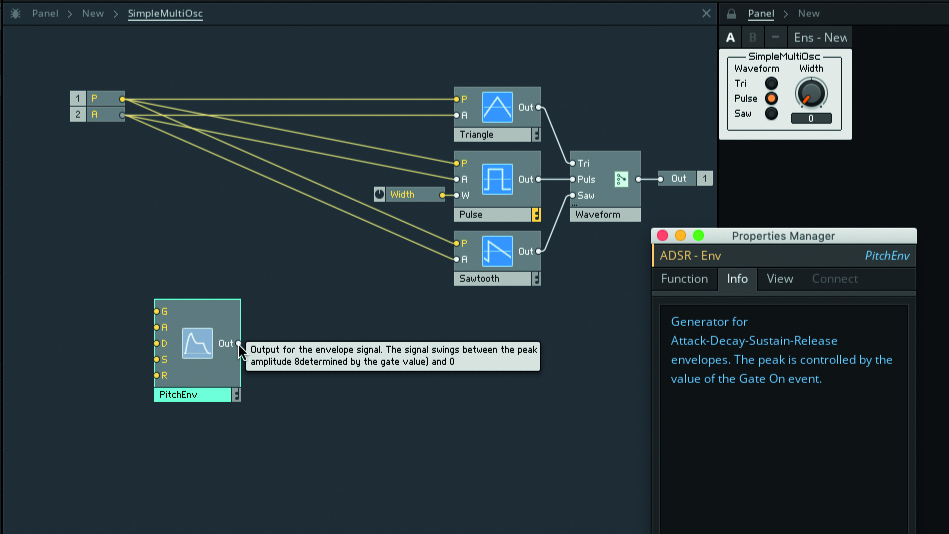
Pace 10: Discover that the maximum value of PitchEnv'southward output depends on the value arriving at its G final. We'll use the Macro's A In Port to drive PitchEnv's 1000 input, but A is afflicted by playing velocity, and so the amount of pitch shift provided past the envelope will also be velocity-affected. Then we demand G to be either 0 or one.
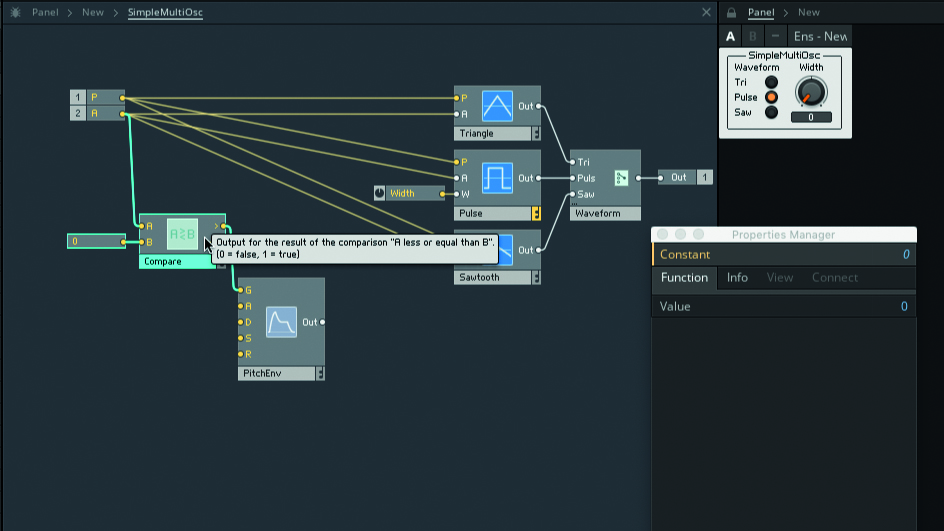
Footstep 11: A Compare module will do this for us – create i with the Searchbox. Connect the A In Port to the Compare'due south upper Input, and a Constant module with value 0 to the lower Input. Now, when A is greater than 0, the Compare's upper Output will have a value of one, otherwise it volition be 0. Connect this upper Output to PitchEnv's G Input.
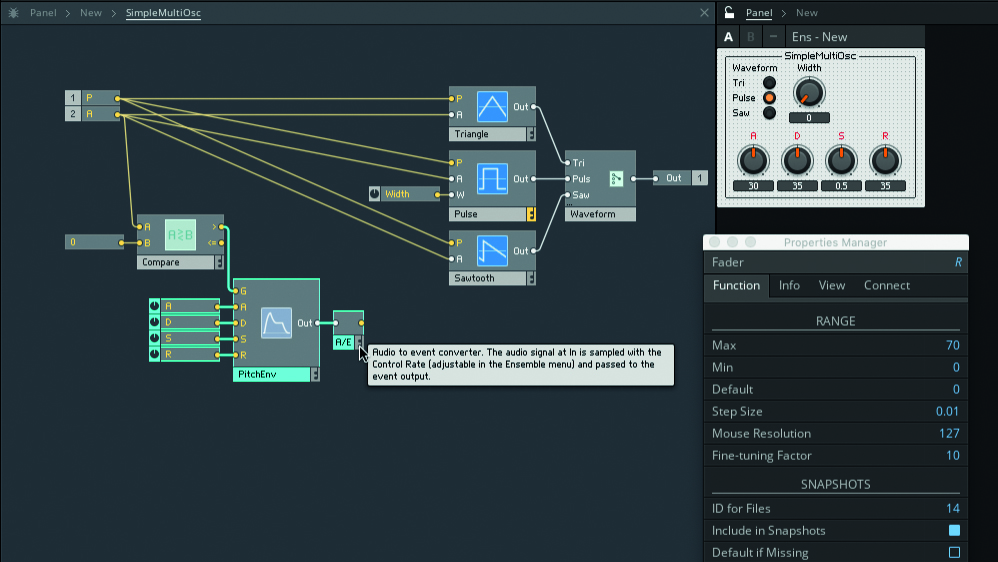
Pace 12: Read the hint text for the envelope'southward other Input terminals and create suitably-configured Knob modules for each. Layout the knobs in the GUI console. PitchEnv's Output is an sound signal, simply nosotros will be using it to manipulate event signals, then create an A to E (ie Audio to Outcome) module and connect it to the envelope'south Output.
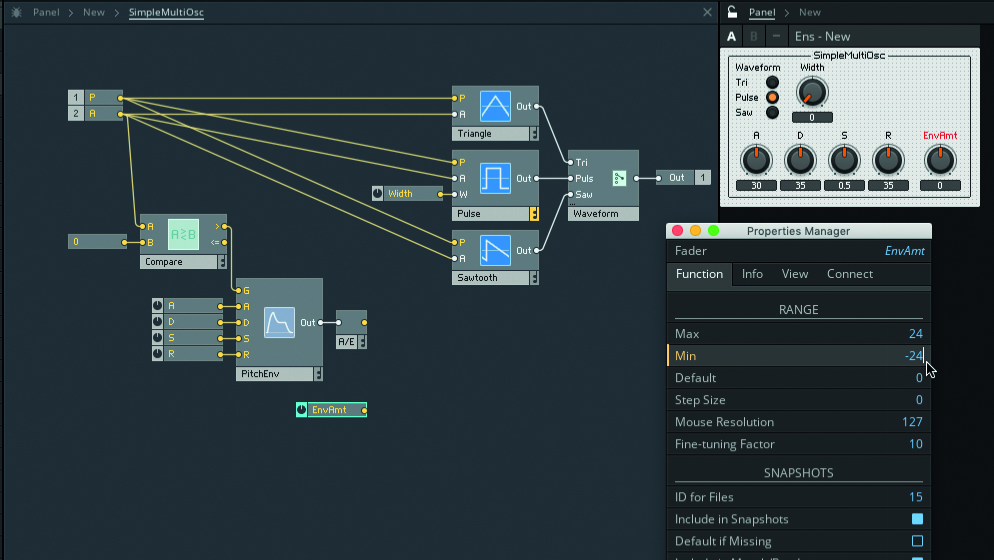
Step 13: Create a new Knob and telephone call it "EnvAmt". The Knob'southward Max value should exist the maximum corporeality of pitch shift that you want the envelope to be able to apply, in semitones; the Min should exist negative the same value. We've gone for 2 octaves, so have gear up Max at 24, Min at -24, and default at 0.
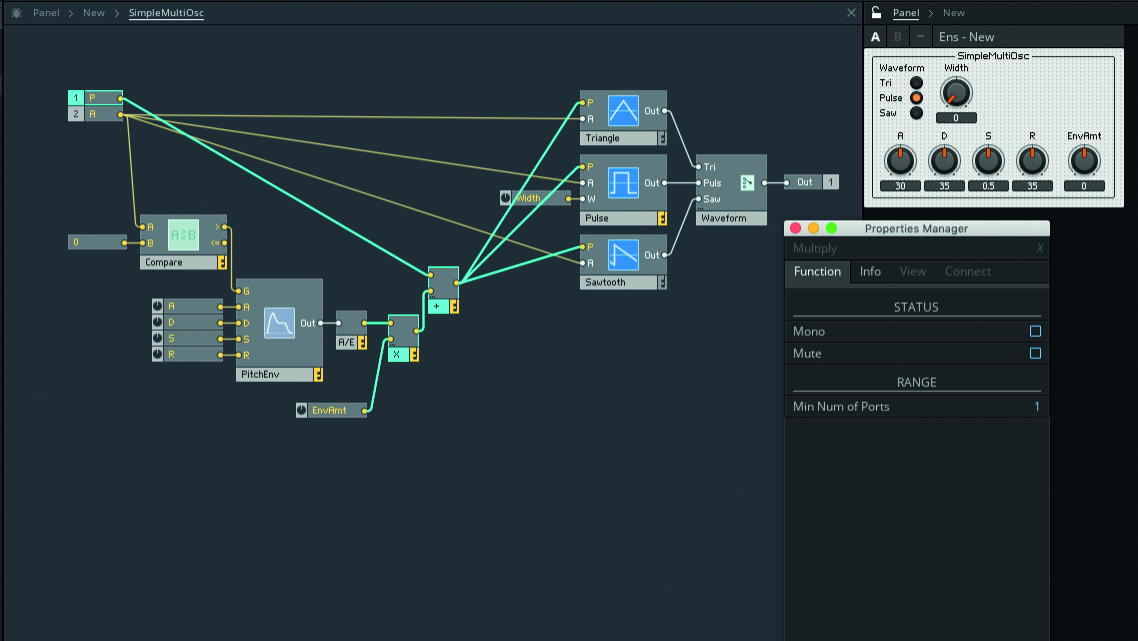
Step 14: Create a Multiply module and connect the A to E module and EnvAmt Knob to its inputs. This will calibration EnvAmt's value by PitchEnv's value. Disconnect the P In Port from the oscillators, and then connect it to a new Add module. Connect the Multiply'south Output to the Add'due south other input. Wire the Add's output to the oscillators' P Input terminals.
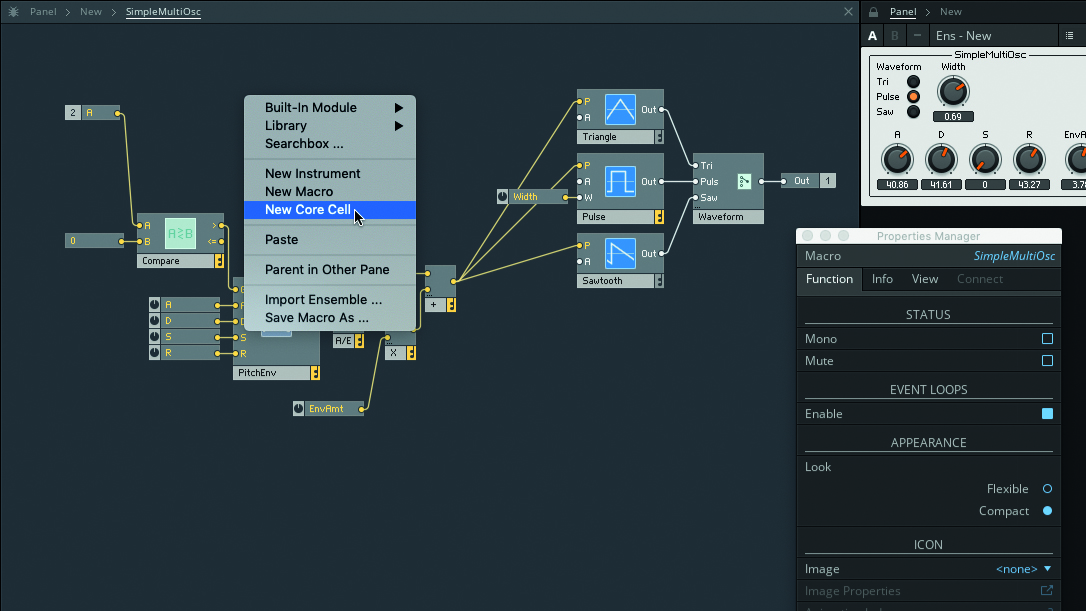
Footstep 15: The release phase is existence lost because the oscillators are stopping as soon as the note is released. We tin can fix this by preventing A In Port values of 0 from being passed to the oscillators – this is a chore for a Core Cell! Right-click in an empty area and select New Cadre Jail cell from the popup. Name the Cadre Cell "GateCntrl".
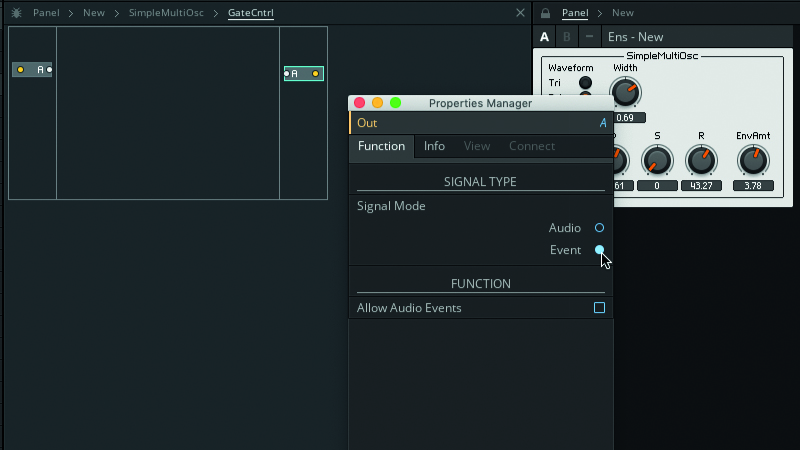
Step 16: Double-click GateCntrl to enter it, and discover the slightly dissimilar appearance – the columns to the left and correct are where you create In and Out ports (respectively), whilst the cardinal area is where you add together Core modules and macros. Create an In and Out port, name both "A", and ensure their Bespeak Mode property is set to Consequence.
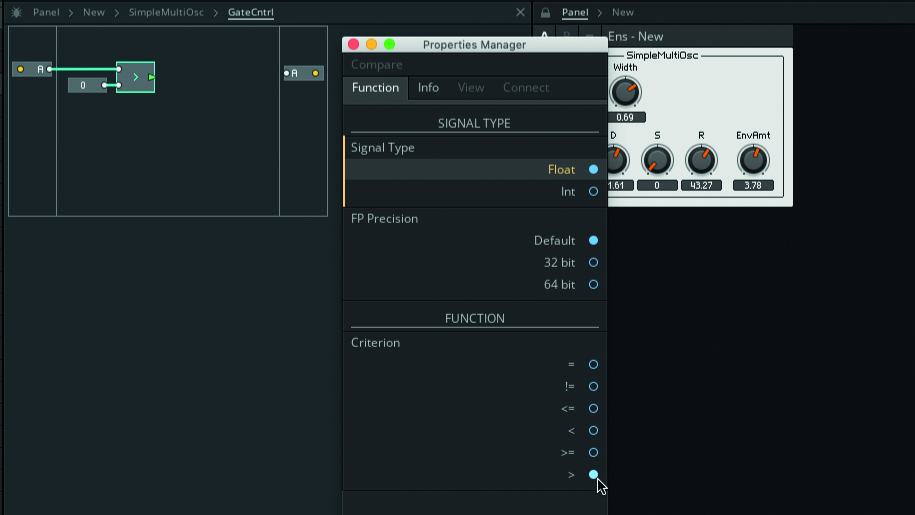
Step 17: Add together a Compare (Flow) module. This compares two incoming values based on the module's "Criterion" property, and outputs a value of True or Faux from the module's BoolCtl (Boolean control) port, represented by a greenish arrow. Set Criterion to >, connect the A In port to Compare's upper Input, and connect a Constant of value 0 to the lower Input.
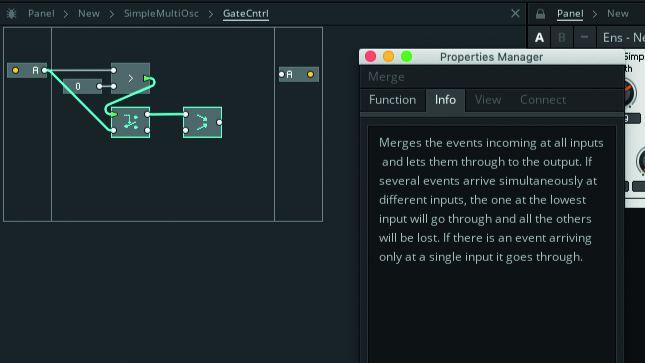
Step 18: Create a Router (Flow) module. This will transport the incoming indicate to its peak Output if its BoolCtl receives a True value, otherwise it volition road the input to the lower Output. Connect the Jail cell's In port to Router's lower Input, and Compare's BoolCtl Output to Router's BoolCtl Input. Create a Merge (Menstruum) module and connect's Router's upper Output to its upper Input.
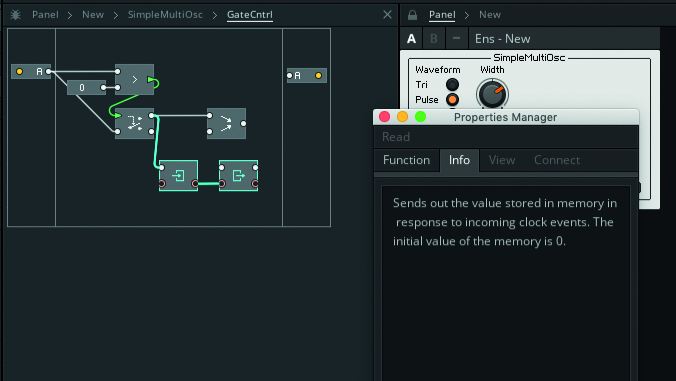
Step 19: Nosotros need to store incoming "A" values that are greater than 0 to apply them when the annotation is released. Create a Write (Memory) module and connect Router's upper Output to its upper Input. Create a Read (Memory) module and connect its lower OBC (Object Bus Connection) Input to Write's OBC Output. This OBC connection ensures both modules access the same memory address.
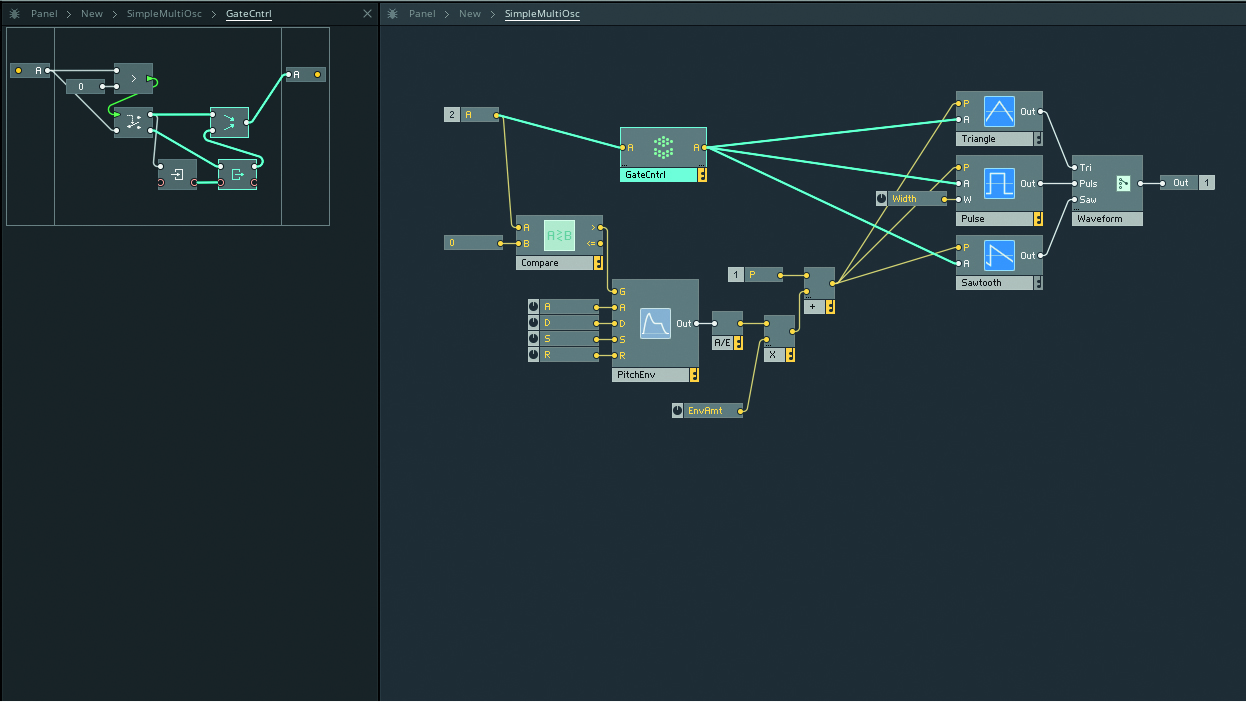
Pace 20: Read will send the stored value when a bespeak arrives at its upper Input, so connect this to Router'southward lower Output – this means when A equals 0, Read volition ship its stored value. Connect Read's Output to Merge's lower Input, and so connect Merge's Output to the Cell's Out port. Return to SimpleMultiOsc and insert GateCntrl betwixt the A In Port and the oscillator's A inputs.
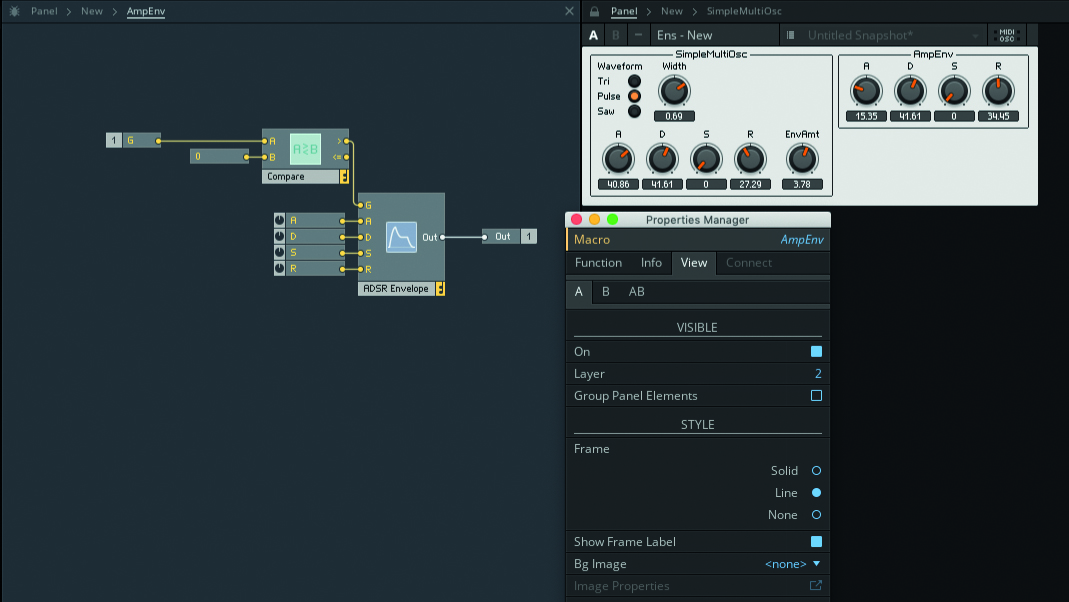
Footstep 21: If you were to play the synth now the notes would carry on forever, so we need an amp envelope. Select and copy PitchEnv, all of its Knobs, the Compare module and its abiding. Return to the Ensemble, create a new Macro named AmpEnv, open up the Macro and then paste the structure. Create and connect a "G" In Port and audio Out Port.
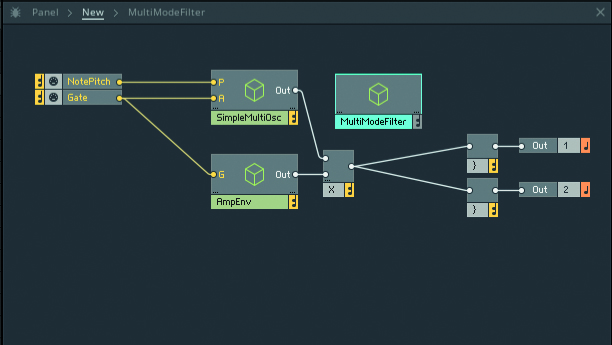
Step 22: Back in the Ensemble, combine the SimpleMultiOsc Output with AmpEnv'southward Output using a Multiply module, and feed the output of the Multiply to the Audio Voice Combiners. Play your synth and notice that envelope release stages are working, just that this synth needs a filter. Create a new Macro and name it "MultiModeFilter", and place information technology near SimpleMultiOsc in the structure.
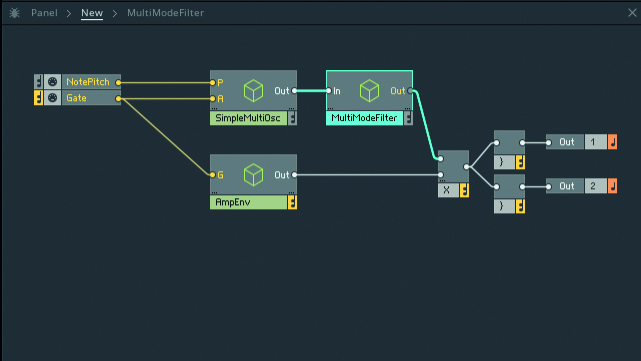
Step 23: Delete the connection between SimpleMultiOsc and the Multiply module. Hold downwardly [Cmd] (Mac) or [Cntrl] (Windows), and so drag from SimpleMultiOsc'south output to the left border of MultiModeFilter – this is an like shooting fish in a barrel mode to create new ports in Macros. Repeat to link the Macro to the Multiply module's Input. Open MultiModeFilter and motility the auto-generated ports into convenient positions.
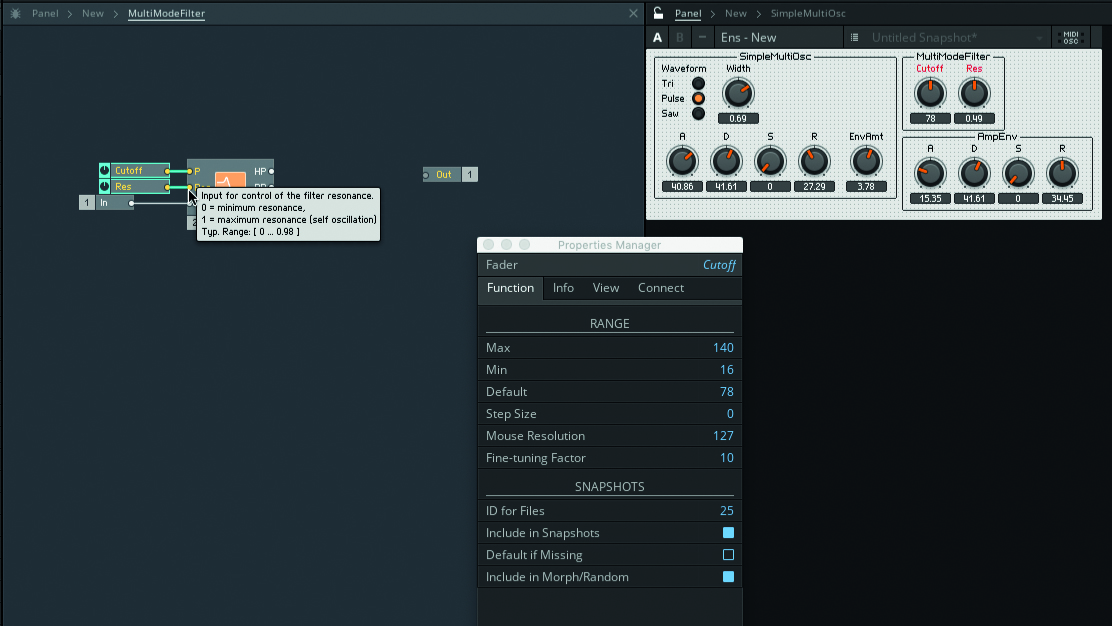
Footstep 24: Add a Multi 2-Pole Filter to the Macro and connect the Macro's In Port to the Filter'southward In terminal. Create a Knob for driving the filter's P input, using a Min value of xvi and a Max of 140. Also create a Knob for driving the Res input, using the settings suggested in the port'due south Hint text.
Step 25: The Filter module outputs High Pass, Band Laissez passer and Depression Pass filtered signals from a unmarried module, so we need to command which is active. Create a Switch module, requite it three input ports and proper name the ports "HP", "BP" and "LP". Connect the Filter's outputs to the Switch, and the Switch's Output to the Macro'due south Out Port.
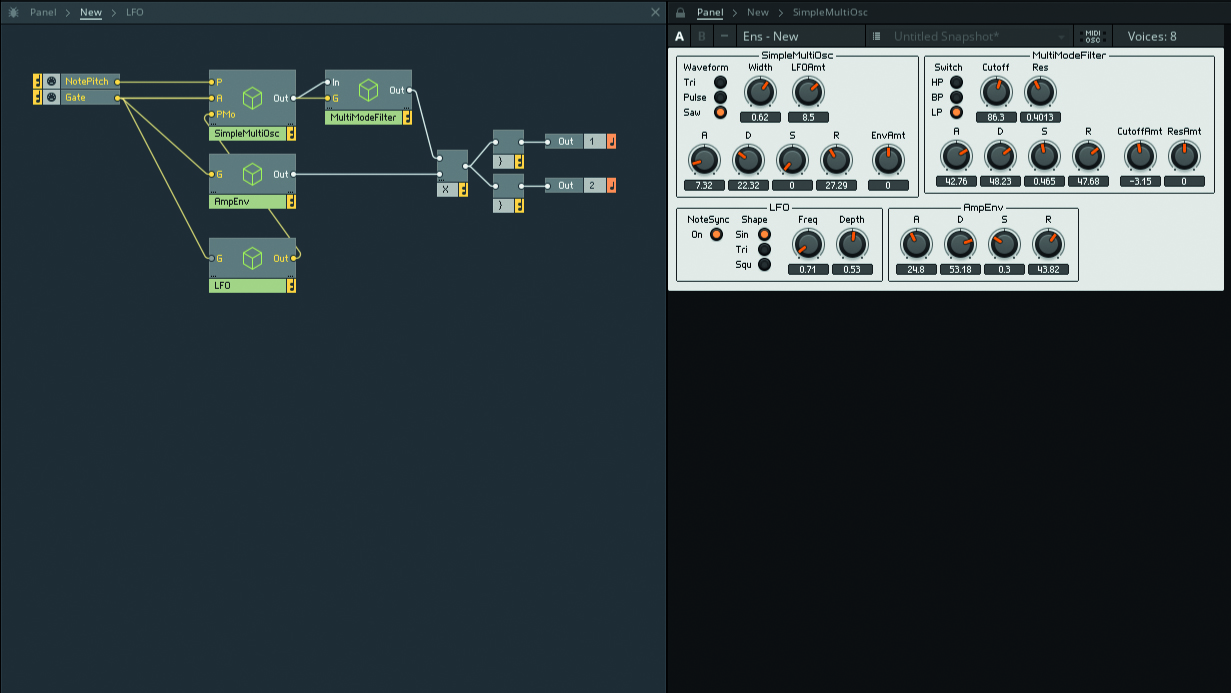
Step 26: Driblet back to the Ensemble and save your synth. Have a play of your synth to see what sorts of sounds you can coax from it, and remember about what more than you could add. A filter envelope is definitely needed, and you should explore adding some LFO too. If you lot've been paying attention so you know what to practise!

Become over seventy FREE plugin instruments and effects…
…with the latest issue of Computer Music magazine

How To Use Reaktor 6,
Source: https://www.musicradar.com/news/how-to-build-a-reaktor-synth
Posted by: sancheznernat.blogspot.com
0 Response to "How To Use Reaktor 6"
Post a Comment